An in-depth story: WSO2 APIM-2.6.0 access tokens from JWT with scopes

On a pleasant Monday morning, you are going to the passport office to apply and get your passport. Let’s assume that you have applied to get the passport on the same day. You provide all your details in the application form to the officer. Upon successful validation, they will create and give you the passport.
So what does the new passport really contain? The authority extracts some important details that you have stated in your application form and will prepare the passport along with the passport number.
In brief, you provide your details and get a pass with the details you have given. This is what today’s blog is about, sharing details via tokens to generate different tokens with the required details.

In this read, we will be focusing more on generating a JWT and its usages in terms of WSO2 products. Please note that WSO2 IS-5.7.0 and WSO2 APIM-2.6.0 (APIM) with the latest wum packs have been used to implement the solution in this blog. To get more details on JWT please do visit my previous blog, JWT: On Focus
Generate an access token from a JWT in APIM

In APIM we can generate access token by providing any grant types. In this blog, we’ll be discussing generating a JWT in an Identity Provider(IdP), and by providing that JWT we’ll generate the access token in APIM. I’ll be using IS as the IdP. To make things more interesting I’ll be using the following use case to implement the solution.
Use-case
By default, in APIM when a JWT is exchanged for an access token, the scopes in the JWT will not be present in the generated access token. The scope will be set as “scope: default” in the access token. In order to pass the claims in the JWT as the scope to the access token, a custom JWTGrantHandler will be implemented.
Furthermore, to assign only certain values as the scope in the access token, the intended values will be passed in the request body. Only the matching scope values in the JWT payload and the request body will be assigned as the scope value in the access token.
Steps to be followed
- Generate a JWT in IdP by providing the scopes
- Provide the JWT and generate the access token in the APIM with the scopes mentioned in the JWT
- Invoke APIs via the newly generated access token

The flow of generating the JWT will differ depending on the grant type. In this blog, we will be creating the JWT based on the authorization code grant, implicit grant, and password grant types. The relevant token generation flow for each grant type will be illustrated in the following topic. Once the JWT is generated the rest of the flow will be the same.
Let’s start the GAME!!!

We will be implementing this use case in 4 main parts as implementing the custom JWTGrantHandler, configuring the IdP, configuring the APIM, and creating applications and API in APIM. Finally, we’ll be testing this in the setup.
1. Set the OIDC claims as scopes
In order to pass scopes in the JWT, I’ll be mapping the existing role claim as scopes in the OIDC claim. This will be added to the JWT while generating it in the IdP (WSO2 IS).
The complete flow has been captured in the following video. Please do follow the steps in it.
I’ll be using the admin user to generate the tokens. Let’s take a look at the roles assigned to the admin user.

Once you generate the JWT from IdP, the payload will contain the scopes as follows.
{
  "sub": "admin",
  "aud": [
    "5phi4esTwaJeBSwmtMbA21OOqQ0a",
    "https://192.168.8.102:9444/oauth2/token"
  ],
  "nbf": 1587139174,
  "azp": "5phi4esTwaJeBSwmtMbA21OOqQ0a",
  "scope": "openid",
  "iss": "https://localhost:9443/oauth2/token",
  "scopes": [
    "Application/jwtSP",
    "Internal/everyone",
    "admin"
  ],
  "exp": 1587142774,
  "iat": 1587139174,
  "jti": "f932b5b1-1d5f-4d00-a13d-49b6bd2ba848"
}
2. Implement the custom JWTGrantHandler
As we have discussed before, we will be creating a custom JWTGrantHandler by extending the JWTBearerGrantHandler class from the org.wso2.carbon.identity.oauth2.grant.jwt package. By overriding the “validateScope()” method we can customize the default flow and inject the logic to pass the JWT scopes to the access token.
In the custom handler, we will decrypt the JWT and decode the payload. Once the “scopes” values are retrieved from the JWT payload (userScopes) the scope set in the request body (requestedScopes) will also be extracted. The userScopes and the requestedScopes will be validated against each other and the matching scope values will be assigned in the newly generated access token. If a scope is not provided or a wrong scope is provided in the request body the access token scope will be set as “default”.
1. Create a maven project.
2. Create a java class and extend the JWTBearerGrantHandler class.
3. Override the “validateScope()” method and implement the following logic. The relevant pom.xml is also attached along with the “CustomJWTGrantHandler” class.
4. Once the logic is implemented, build the jar using the following command.
mvn clean install5. Place the jar inside the <wso2am-home>/repository/components/lib folder. Once the server is started you can view that the OSGi bundle for this will be created in the <wso2am-home>/repository/components/dropins folder.
6. In order to configure this jar and get the custom flow to be executed during the runtime, modify the following entry in <wso2am-home>/repository/conf/identity/identity.xml file.
Please note that I have taken the “scopes” value and set it as the “scope” in the access token. I have passed the role claims in IS as “scopes” inorder to avoid the ambiguity with the OpenID scope. You can use any values to be set as the scope in your access token from the JWT. You can refer to the complete project in the GitHub.
3. Configure Identity Server as the IdP
WSO2 IS can be configured as the IdP or you can configure external IdPs such as PING, Okta as well. For demonstration purposes, I’m using the wso2is-5.7.0 + 1587142341752.
1. Start the IS server and login to the carbon management console via https://localhost:9443/carbon.
2. Navigate to Main → Service Providers → Add and provide a unique name for the service provider. As the next step, click on the Register button.

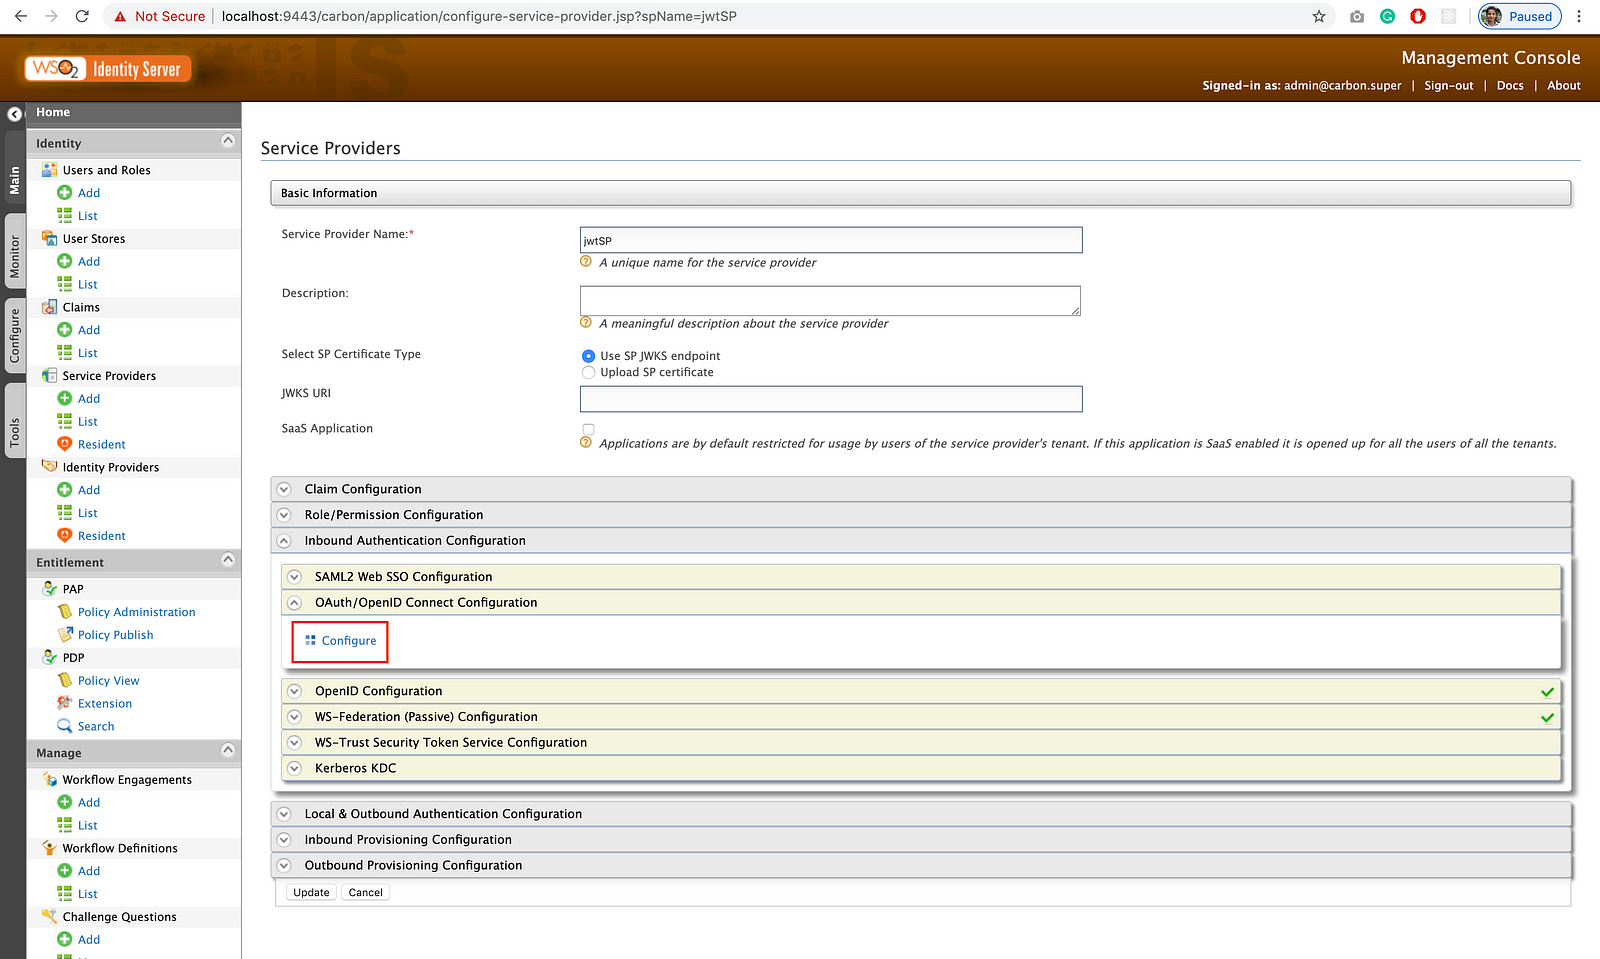
3. Once the registration process is done the following UI will be displayed. In that UI click on Inbound Authentication Configuration → OAuth/OpenID Connect Configuration → Configure.

4. Configure the service provider by providing values to the highlighted fields. “http://wso2is.local:8080/playground2/oauth2client” has been set as the callback URL and set the token issuer as JWT. Once the configurations are set click on the Add button.

5. Next, you will be directed to the below page with the client ID and client secret. Click the Ok button in the pop-up window and click on the Update button to save the changes.

3. Configure the IdP in the API Manager
Since both APIM and EI nodes are running on the same server there will be port conflict. To avoid that, configure the port offset value in <wso2am-home>/repository/conf/carbon.xml file as follows.
<Offset>1</Offset>As I have set the offset=1, the IS server will run on port 9443 and the APIM server will run on port 9444 (default 9443 + offset 1).
Let’s configure the IdP in the APIM!
1. Start the server and login to the APIM carbon management console via https://localhost:9444/carbon/
2. Navigate to Main → Identity Provider → Add and provide the following details. Once all are set click on the Register button to save the changes.
- Identity Provider Name: A unique name should be provided. If you are using an external IdP other than WSO2 IS, provide the token issuer URL as the IdP name.
- Choose IDP certificate type: Upload the IdP public certificate. In order to generate the certificate for WSO2 IS go to <wso2is-home>/repository/resources/security folder and open a terminal. Execute the following command to generate the certificate. The generated certificate will be placed in this security folder.
keytool -export -keystore wso2carbon.jks -alias wso2carbon -file <name>.pem- Alias: This is the token endpoint. Copy this URL which you will need to set in the IS’s SP which you have created. Go to IS carbon management console → Main → Service Provider → List → select the edit button in the created SP → Inbound Authentication Configuration → OAuth/OpenID Connect Configuration → Edit and you will see the following page.

Tick the Enable Audience Restriction and under Audience paste the URL you have copied in APIM Alias. Click on the Update button to save the changes and follow the same steps as mentioned under the 3. Configure Identity Server as the IdP topic.
4. Create an API and an Application in APIM
- Go to APIM Publisher via https://localhost:9444/publisher, then follow this document to create and publish the API.
- Go to APIM Store via https://localhost:9444/store and subscribe to the published API.
- Get the application client ID and the client secret. You can retrieve these values from the store portal and carbon management console as well.
a. Details from store portal

b. Details from carbon portal
Navigate to APIM carbon management console → Main → Service Providers → List → Select the Edit button of the Application

Navigate to Inbound Authentication Configuration → OAuth/OpenID Connect Configuration and you will be able to view the application credentials.

Testing Time!
Testing involves 3 main parts: generating JWT with each grant type in IdP, generate access token by proving JWT in APIM, and invoking the APIs with the generated access token.
Generate JWT in IdP
The JWT generation flow for each grant type is illustrated in the following diagrams. Due to the length of the access token and id token I have replaced the actual values with the keywords access_token and id_token respectively.
client id of the IS SP = 5phi4esTwaJeBSwmtMbA21OOqQ0a
client secret = WPtH9onDRGa6nDwhYZqA9_Qrcb0a
scope = openid
a. Authorization code grant type

1.Generate an access code from IS(IdP)
response_type = codeRequest:
https://localhost:9443/oauth2/authorize?scope=openid&response_type=code&client_id=5phi4esTwaJeBSwmtMbA21OOqQ0a&redirect_uri=http://wso2is.local:8080/playground2/oauth2clientResponse:
http://wso2is.local:8080/playground2/oauth2client?
code=1540521d-109b-3d59–96b5–03763ccd0120&
session_state=5892cc8f5f5b35a4392f58a0688069d227c2a1a69ffbcda1099028dbed7c7a4b.4gvbSbXbiUUyLd2rCLTSqA
2. Get the access token from IS (IdP)
response_type = tokenRequest:
curl -k -X POST -H "Content-Type: application/x-www-form-urlencoded" -d "grant_type=authorization_code&code=1540521d-109b-3d59-96b5-03763ccd0120&redirect_uri=http://wso2is.local:8080/playground2/oauth2client&client_id=5phi4esTwaJeBSwmtMbA21OOqQ0a&client_secret=WPtH9onDRGa6nDwhYZqA9_Qrcb0a" https://localhost:9443/oauth2/tokenResponse:
{
  "access_token":access_token,
  "refresh_token":"35739d90-ae94-315b-a9ae-ce248eb5a7d6",
  "scope":"openid",
  "id_token":id_token,
  "token_type":"Bearer",
  "expires_in":3600
}
b. Implicit grant type

- Get the access token
response_type = tokenRequest:
https://localhost:9443/oauth2/authorize?scope=openid&response_type=token&client_id=5phi4esTwaJeBSwmtMbA21OOqQ0a&redirect_uri=http://wso2is.local:8080/playground2/oauth2clientResponse:
http://wso2is.local:8080/playground2/oauth2client#
access_token=access_token&
token_type=Bearer&
expires_in=3599&
session_stat
c. Resource owner password credentials grant type

- Get the access token
username = admin
password = adminRequest:
curl -k -d "grant_type=password&username=admin&password=admin&scope=openid" -u 5phi4esTwaJeBSwmtMbA21OOqQ0a:WPtH9onDRGa6nDwhYZqA9_Qrcb0a https://localhost:9443/oauth2/tokenResponse:
{
  "access_token":access_token,
  "refresh_token":"4e91a156-88a3-3224-b1ab-54c1c987f01e",
  "scope":"openid",
  "id_token":id_token,
  "token_type":"Bearer",
  "expires_in":3600
}
Provide the JWT and get the access token with scopes in APIM
- Generated JWT
eyJ4NXQiOiJOVEF4Wm1NeE5ETXlaRGczTVRVMVpHTTBNekV6T0RKaFpXSTRORE5sWkRVMU9HRmtOakZpTVEiLCJraWQiOiJOVEF4Wm1NeE5ETXlaRGczTVRVMVpHTTBNekV6T0RKaFpXSTRORE5sWkRVMU9HRmtOakZpTVFfUlMyNTYiLCJhbGciOiJSUzI1NiJ9.eyJzdWIiOiJhZG1pbiIsImF1ZCI6WyI1cGhpNGVzVHdhSmVCU3dtdE1iQTIxT09xUTBhIiwiaHR0cHM6XC9cLzE5Mi4xNjguOC4xMDI6OTQ0NFwvb2F1dGgyXC90b2tlbiJdLCJuYmYiOjE1ODcxNDE4MjMsImF6cCI6IjVwaGk0ZXNUd2FKZUJTd210TWJBMjFPT3FRMGEiLCJzY29wZSI6Im9wZW5pZCIsImlzcyI6Imh0dHBzOlwvXC9sb2NhbGhvc3Q6OTQ0M1wvb2F1dGgyXC90b2tlbiIsInNjb3BlcyI6WyJBcHBsaWNhdGlvblwvand0U1AiLCJJbnRlcm5hbFwvZXZlcnlvbmUiLCJhZG1pbiJdLCJleHAiOjE1ODcxNDU0MjMsImlhdCI6MTU4NzE0MTgyMywianRpIjoiNmVlOWM5NmYtNzNlYi00Y2JlLTlhNTctNGE5Y2JiNTcxOTg2In0.WHffNHEv78WQ2RS_y-sccdIDxw7n7l81OEV2I0_eeQeUegh_jTS-1V-LJXF0vf7w1L7ZkGcW3HyA_mblKryZqv8cY7nOLDUmqkvBttgHeWfOBiH10aomx-ipOu2odTIN3oUtxE55qa7nMI2A1Ft1trd06Ca4Xo5FU0D46VKKWSxqshYKuzKxAJ8I_47AHs4UomkvfFyT-MwuHqsEvUXIY4RFbvORpAtp_isC1NWiewccCxqg2mtdx5_AZs8ZEdAi5w4dssOsf9mxQSs9Awotgn3g4vFxtipDrdYeWL4eqlPzu3pFG7g2PmR8LzrECcwJ8aRTsbiKq8rmRGOpmiN7zw- The decoded payload for the generated JWT in IdP is as follows.
{
  "sub": "admin",
  "aud": [
    "5phi4esTwaJeBSwmtMbA21OOqQ0a",
    "https://192.168.8.102:9444/oauth2/token"
  ],
  "nbf": 1587141823,
  "azp": "5phi4esTwaJeBSwmtMbA21OOqQ0a",
  "scope": "openid",
  "iss": "https://localhost:9443/oauth2/token",
  "scopes": [
    "Application/jwtSP",
    "Internal/everyone",
    "admin"
  ],
  "exp": 1587145423,
  "iat": 1587141823,
  "jti": "6ee9c96f-73eb-4cbe-9a57-4a9cbb571986"
}- Generate the access token
scope = admin(existing scope)Request:
curl -i -X POST -H 'Content-Type: application/x-www-form-urlencoded' -u TAZT77PSm3xt5bMVLLnjqn8_4PIa:Kfr2fCYniv5OOXED_xsfWH_qHLIa -k -d 'grant_type=urn:ietf:params:oauth:grant-type:jwt-bearer&assertion=<JWT>&scope=admin' https://localhost:8244/tokenResponse:
{
   "access_token":"cb351e82-b7b6-3034-883d-4bc86261f0e4",
   "refresh_token":"b5cf4a9b-0d33-3057-95dd-bac83e6cec62",
   "scope":"admin",
   "token_type":"Bearer",
   "expires_in":968
}
You can provide multiple scopes as well in the request body as scope=admin+Application\/jwtSP or scope=admin Application\/jwtSP.
scope = admin123(non-existing scope)Request:
curl -i -X POST -H 'Content-Type: application/x-www-form-urlencoded' -u TAZT77PSm3xt5bMVLLnjqn8_4PIa:Kfr2fCYniv5OOXED_xsfWH_qHLIa -k -d 'grant_type=urn:ietf:params:oauth:grant-type:jwt-bearer&assertion=<JWT>&scope=admin123' https://localhost:8244/tokenResponse:
{
   "access_token":"b702f17b-7150-3086-af10-2c92ab5a31c4",
   "refresh_token":"60bd4f25-a02d-3b7c-abc0-a967b07a34d8",
   "scope":"default",
   "token_type":"Bearer",
   "expires_in":45
}
When non-existing scopes are given in the request body, the scope will be assigned as default and if existing and non-existing scopes are given at the same time in the request body, only the existing scopes will be added to the access token.
Invoke the API with the generated access token
You can simply test the API invocation flow with the APIM store portal. You also can try invoking the curl command in the terminal or provide the request URL and the access token in Postman and test.
Store portal
The store portal swagger UI result is as follows 😄

Request:
curl -k -X GET "https://192.168.8.103:8244/tester/1.0.0/check" -H "accept: application/json" -H "Authorization: Bearer 49e2d5ad-7701-386d-a0a9-1f11e7464a41"Response:
{ "hello": "world" }
Recap!
In this blog, we have covered topics on generating JWT in WSO2 IS and by providing it we generate the access token in WSO2 APIM. It is not mandatory to use IS, you can replace it with any other external IdP to generate the JWT by adding the necessary scopes to it. Hope this was a useful read. Please do try this and share your thoughts in the comments!
Stay home! Stay safe! Stay hygiene!
Happy learning!

